Doors,Cedar, and Mayhem.

Thursday, October 22, 2015

Long time no see my little birdies!!! I have been so busy with holiday orders, parenting two crazy minions, fall festivities, and my sister's baby shower. Lets talk about this wonderful baby shower. I got the dumb fabulous idea to #1 help organize and decorate the baby shower, #2 build her a hope chest for the baby, and #3 build a changing table!!! Next time I decide to put that much on my plate one of you please smack said plate out of my hands. The changing table inspiration came from this photo I stumbled across
Isn't it gorgeous! It is actually a potter's stand that they are using as a changing table. Little secrets peeps, I have never made a potters stand or a changing table. There were no plans for this so I'm over here like "I am a confident, independent woman, I don't need no stinkin' wood plans. I GOT this!" That was over two months ago. So, I found a plain white door and my father in law actually has a saw mill on his property (small plug, they also run an awesome restaurant called "The Cave Bar and Grill" if you are ever in Missouri make sure to check it out.) so I was able to get some GORGEOUS slices of cedar from him. Long story short the door idea didn't work with the cedar. The white door took away from this gorgeous piece of wood so I had to scratch that plan.
Cue making my husband come help me devise another plan. THIS is what we came up with
Yes I am aware it does not look like much now BUT I still have to add a shelf to the top, the shelf for the bottom for a cute basket to sit, and possible chicken wire or crib springs to the entire back, as well as stain the frame and shellac and seal the changing table top. Did I mention I only have until the end of November to get this done? After all this mess here is my work space. 
I had this clean just a few weeks ago!!! Now it may sound like I am complaining but don't think that. I thrive under pressure and deadlines. I am also extremely thankful to be blessed enough to be able to have the ability to make things like this for my family. Hopefully it turns out like I am envisioning. 
On another note fall is here!!! What is your favorite fall dessert? Leave the recipe link in the comments and I will do a post on the yummiest!


Diaper Purgatory and September Swap

Saturday, October 3, 2015

Hello all my wonderful readers!! Sorry I have not posted in a while. My sister is having her first baby in January and I have taken over a lot of the baby shower duties, so I have been SUPER busy. This right now is my life.

This my friends is my attempt at a diaper cake. I will let you know if I survive. I still have her toy box and changing table to make as well as other decorations to get finished. I just keep telling my self that I DO love my sister, and seeing her get fat  with that pregnancy glow will make all this worth it! 
In other news!! I am part of an awesome swap group where each month two bloggers get partnered up and exchange a little care package. It is a great thing too because the package seems to come just when I need it. This month I was paired with Bethany from Dandelion Pie, how freaking cute is that blog name! Make sure to head over and check out her blog! She sent me the CUTEST elephant ring holder! Which I was in dire need of since my husband keeps buying me jewelry thinking I will wear it. I am accident prone enough without wearing a bracelet while running a saw. I think he just wants to insurance money, haha COMPLETELY JOKING!! Here is the ring holder
Can you get any cuter?! I must get back to those diapers now, I will be posting some more tutorials soon so if there is something specific you would like a tutorial on let me know in the comments! Also make sure to head over to the shop and check out all the cute seasonal stuff that is up and maybe get a head start on Christmas. 

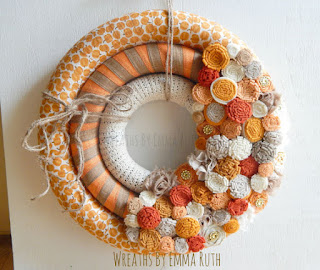
As you all know we purchased a new house this past July. We have a GORGEOUS wooden double front door, made moving furniture in super easy, and I have been looking for the perfect piece to hang on it. That is where this month's Etsy Seller Feature comes into play. You know those super cute wreaths you see at the big name craft stores? Well this sellers items grind them into the dirt put those to shame!! Emily Meyer owns Wreaths by Emma Ruth and she does some AMAZING work.

How freaking cute is that wreath!!! It just screams FALL IS HERE! 
Emily started making wreaths four years ago when her first child was born. All her wreaths have a certain style to them that makes them Wreaths by Emma Ruth. You won't find any like these at a retail store. Her hardest thing so far in running her own shop? Keeping it stocked! If you take a look at her etsy shop it may look a little bare, that's because her wreaths sell almost the minute she posts them to her facebook. So, make sure to like her page here, that way you don't miss out. 
I asked Emily what are some tips she would give someone wanting to open a shop. Her list was 
1. Do you research. 2. Create policys YOU are comfortable with. 3. Branding- make your look clean and cohesive, but have something special that sets you apart from other shops. 4. Have fun, don't give up!!
Those are some awesome tips people!
She also makes wreaths that would go perfect in a nursery.
Almost, ALMOST, makes me want another one so I can decorate a nursery. Wait, I hear the two I have arguing so there goes that feeling. 
Make sure to stop by Emily's facebook and etsy shop. These would make a perfect gift for pretty much anytime of the year!


Diy Wooden Cabinet Organizer

Friday, August 28, 2015

We bought our first house in July and I absolutely LOVE it. My kitchen has a ton of cabinets and storage space but I keep running into one tiny problem, the cabinet under my sink. I think no matter where you live this space is never big enough. Between 2 kids, 3 dogs, and a husband I have to keep cleaner and disinfectant stocked up. This here is the current situation down there

It's terrible, I know, don't judge me too harshly. I have tried the racks you can buy for under the cabinet and didn't like them. I figured this space would always be a disaster UNTIL I was browsing one of my all time favorite sites Ana White and came across this gift from the wood working angels! 
Ok, so now you are probably thinking "How cute! That looks way too complicated." Wrong missy!!! This is so freaking easy to make it could even be....wait for it....your FIRST wood working project! *Gasp* What did she just say?? That's right ladies YOU can make this and I am going to show you how. 

First! We need to gather our supplies. Here is the link to the plans on Anna's site but I am going to walk you through step by step.  The only thing I changed was that I do not need a paper towel holder for under the sink, so I added a shelf to the top to hold my sponges and scrubbies. For supplies you are going to need 
  1. 1- 1x6x6 board 
  2. 1-1x2x2 (buy a 1x2 furring strip, its saves you $1 ( can you say Hershey bar for the ride home) and for something like this there is no point buying the fancy 1x2
  3. Either 2 inch finish nails or screws UNLESS you are using a Kreg Jig then you will need 1 1/4 pocket hole screws 
  4. 4 small L brackets
  5. If you are NOT using a kreg jig I recommend a counter sink bit and wood putty to cover the holes made from screwing from the outside but this is just a suggestion. 
  6. Sander
  7. Jig saw
  8. Regular saw
**Anna's plans call for 13 1/2 inch pieces instead of 12 inch. Make sure to measure your cabinet door BEFORE cutting your wood. 13 1/2 would have been just a tad too wide for my door but 12 was perfect**

Lowes will have all of these things and they will even go ahead and cut the wood down for you (which I recommend because it saves you a step)

Here is what all the pieces should look like once they are cut to size.
You are going to cut two 18 1/2 inch long pieces from the 1x6 and one 12 inch piece. Then take your 1x2 and cut two 12 inch pieces.  If you are going to add a top shelf like I did instead of a paper towel holder then go ahead and cut another 1x6 piece at 12 inches. 

I forgot to take photos of cutting the curve in the 18 1/2 inch piece but I just took a quart paint can (feel free to free hand) drew an arc and then cut it down with a jig saw. 
Next we are going to go ahead and drill all our holes. If you are using a kreg jig then go ahead and drill your pocket holes. If you are just screwing in from the outside you are going to want to go ahead and drill your pilot holes and counter sinks as we go. For those of you using a kreg jig here is what your holes should look like (make sure to do the same for the shelf piece if making a shelf)
Those of you not using pocket holes just follow along with the rest of the tutorial but where I am just putting it together you will need to put it together just like I am but drill a pilot hole (use a bit slightly smaller than your screw) from the outside where your wood meets. Then, if countersinking, drill your counter sink hole, and finally use your 2 inch screw and put it together. 

On to assembly!! We are going to take the 1x6x12 base piece and screw it to the side like so
screw both sides on so that it ends up looking like this 
Easy peasy! Now for the 1x2's. The top 1x2 needs to be placed 1/2 inch down from the top. So measure 1/2 inch from the top, mark a line, and that is where the top part of you r 1x2 should line up. For the bottom one just eye it where you want it to go. I put mine 2 1/2 inches from the bottom. Once you have all of them in place it should look like this.
If you are adding the paper towel holder refer back to Anna's plans. If adding a shelf like I did then stay with this tutorial. For the shelf you should have drilled pocket holes just like you did for the base. To figure where I wanted my shelf I measured 4 1/2 inches from the top and placed a line. The TOP of your shelf should line up with this mark. Lay your organizer on its side and screw in your shelf. You should end up with this. 

Wham Bam Thank You Mam!! You just made a cabinet organizer!!!! 
Now we have to sand, paint or stain it, unless you screwed from the outside then wood putty the holes and sand it down. . I painted mine red simply because I love red but it goes with NOTHING in my kitchen and this won't really bee seen. 

The last thing to do after your paint has dried is to hang this baby up. If your husband is like mine then you don't dare put any holes in any surface of the house!! If it's gonna be nailed, screwed, hammered, or drilled into any area of the house I am not allowed to touch it. Which I am totally fine with because this way if it gets messed up I can deny all knowledge of it. So once my main minion got home I proudly showed him my newest project and he set about hanging it for me. 
                    
 
After it is all hung up you can set all your cleaning supplies inside, sit back, and enjoy your handy work. 


You go handy ladies!! 
I would LOVE to see pictures of all your finished projects so make sure to stop by and leave them in the comments. 

**Remember, if you don't want to create this on your own you can also message me on my etsy shop, Sparrows Edge Designs, and I will build one just for you. 


The wonderful world of Etsy

Monday, August 24, 2015

What do you think of when you hear the word Etsy? A wonderful world of handmade goodies, everything from cupcakes to handmade leather sex toys? Or do you think of a site where bored housewives decide to try and sell their crocheted booties? It is all of that. Etsy is a site where so many people from all walks of life go to put their works of the heart out there for you and everyone else to judge. Moms, daughter, grandmas, dad's, waiters, businessmen, all of these people can be found on etsy selling just about anything you could want. But, most  a LOT of Etsy sellers are women that are trying to help offset costs at home or want to make enough to quit their 9-5 job and stay home creating, not for the money but for the feeling of being able to make something with your own hands and have someone else say "Wow, I love this!". Starting at least once a month I will be featuring one etsy seller. Some will be shop owners that have very successful shops and know all the ins and outs. Others will be sellers that are just getting out there with their items. So, to start off our Etsy Seller Feature for this month we are going to feature Megan from ShiMMer.
Megan began her etsy shop just this July!!! She sells some beautiful hand stamped jewelry. 

She makes items for EVERYONE from teachers (it's not too late for that back to school gift), photographers, and just inspirational pieces. She is one of the many sellers on etsy that also has a job outside of creating. When asked about her store she said the name came from her daughter "The name fits perfectly not because the jewelry I make is shimmering but because shimmer means to shine with a tremulous light. Very fitting for my personality. I like to shine but can be lacking in courage and let my shyness get in my way at times." I totally think that is something every one of us can relate too.
So what does an etsy seller like Megan love to make most? "My favorite item to make would be anything custom. I know that with out a doubt that piece will be cherished for years to come and love seeing the excitement on my customers faces when they see it."
One of the main thing us etsy sellers love is seeing our customer happy, no matter what. Every once in a while you will come across that one seller that could care less about customer service but that is rare. Make sure you head over to ShiMMer and check our all of Megan's pieces. The holidays are right around the corner and these would make ADORABLE gifts (I am looking at all the husbands out there). Do you have a talent you want to share with the world? I asked Megan what advice she had for anyone wanting to open and etsy shop and she summed it up PERFECTLY.
"To anyone who has been wanting to open a shop of your own I say GO FOR IT! I'm a big believer in accomplishing your dreams. We get so busy in our everyday life that we sometimes for get about things that make us happy so do something for yourself and give it everything you've got!!"

Diy Pillow Case Envelope Style

Thursday, August 20, 2015

First tutorial!!! Whoo hooo!! Ok, so it is not going to be a wood working one to start with. My workshop is a war zone disaster at the moment due to us moving.
I tried to get my husband to clean it all up but he insists we do it TOGETHER. I am all for spending quality time with the hubs but I would prefer it be with flowers, food, and chocolate, not a hot sweaty garage and him barking orders. My first tutorial is going to be on handmade, and painted, pillow cases!! We have a super comfy couch but it is very, shall we say bachelor pad looking. It would really improve with some cute throw pillows.

 So let's get started.

This will be a two part post, today we are going to focus on the actual pillow case. To begin with you will need either an old pillow you want to cover or a pillow form. I am going to be working with a 14x14 pillow. Second you will need 1 yard of fabric ( you can make two pillows cases with one yard), matching thread, pins, an iron, cutting mat, rotary cutter (scissors work but a rotary cutter makes things so much easier) and a sewing machine.
 First we are going to measure and cut our fabric to size. To figure out what size you need your fabric take the width of your pillow and add 1 inch. My pillow is 14 inches wide so I will cut my fabric to 15 inches. Next take the length of your pillow (mine is 14) double it and add 6. So 14+14=28, 28+6=34. This is how long your fabric will be so there is plenty of room to hem and have the back pieces overlap.
Next we will iron the edges for our hem. Fold each edge about 1/2 and inch and iron it down, then fold over another 1/2 inch and iron. Its totally fine if its not exactly 1/2 of an inch (mine never are) the beauty of this pillow is that there is room for error. Once the edges are ironed down take the fabric to your machine and sew those hems. Now guess what...you are halfway done!!! Look at you all Martha Stewart like!
 Once you have your hems finished lay your fabric down with the nice sides of the hem facing up, if you do this part backward then the ugly part of your hem will be on the outside when you are finished. Lay your pillow form in the center of the fabric and bring one side up, and then the other side. Take a pin and pin the hems on each side and then wiggle your pillow out. Once your pillow is out of the fabric repin so that both sides of the fabric are pinned together.


Got it? Good, because here comes the last step.Take the fabric to your machine and sew each side with a 1/2 inch seam allowance. Don't forget to back stitch. Once you have both sides sewn together flip the case inside out through the back opening. Voila!! You just made a pillow case you crafty little minx!! Stuff that pillow form into the case and you are done!


Unless of course you want to go crazy and paint a custom monogram on it??!! You know you do. But it will have to wait until my next post because right now I have to go help the hubs in that sweaty garage. Ugh, but at least that means you will get some wood working tutorials in the future. Make sure to check back for the monogram tutorial!

If you don't want to go through all this though you can always order a SUPER cute custom case from me here.

Here we go

Wednesday, August 19, 2015

I was told I should start a blog.  I have always wanted to have a blog but every time I go to start one I get blocked. I have no idea what people would like to read or not read. So, I am going to give this a shot and see what happens.
 My name is Kayla and I run an etsy shop as well as a crazy smooth household of two girls.
 My etsy shop Sparrows Edge Designs is fairly successful. I average about one order a week on a good week. I make handmade wood decor items.

I do some amateur carpentry around our home. I have built our kitchen table, some chairs for my girls. One day I would like to be bigger and make more beautiful pieces. I would LOVE to make this blog into a place to spotlight other etsy sellers and maybe throw in a few tutorials here and there. So, stay tuned for the fun stuff!!
Proudly designed by Mlekoshi playground